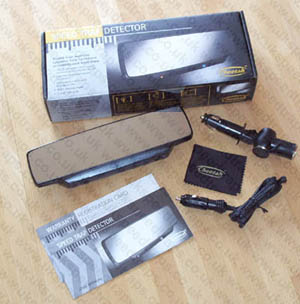
The Cheetah radar detector is like nothing I have seen before. Cheetah have decided to build in to a rear view mirror a radar detector and they have done a very good job. Its well built and well thought out and the unit is very discrete. The control buttons and lights do not stand out, in fact the whole unit just looks like you have added a panoramic view mirror to your old mirror. You could also leave the detector in situ when parked up as it does not stand out.
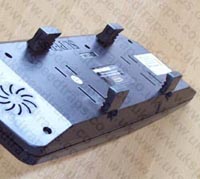
Above: The 4 support clips giving plenty of adjustment
Its mounted on the original mirror by 4 clips, two are fixed and two extend out and it should fit over most sizes and shapes of rear view mirror. The power cable then runs round the windscreen trim and down to the cigarette lighter socket.
Cheetah also provide you with a very funky but slightly over the top multi adjustable 2 way power clip that fits into the cigarette socket , allows you to power the Cheetah and also another device such as a mobile phone.
The mirror makes a big difference to the view behind the car and the anti-glare tint helps the clarity of the view. I could see out of the side rear windows no problem, so not only are you getting warnings of live speedtraps you are improving on your rear and side visibility.
On the unit are 6 discrete LED's for Power, Radar Warning (3 LED's), Hi/Low sensitivity, this turns off Ka and Ku band sensing in low mode and Night mode. 4 push button switches control the power, Night mode, high/low sensitivity setting and the self test button. There is also a rotary volume control. The unit covers k, ku, ka bands and laser.
The instructions are not bad, they could be better but to be honest you don't need a degree to work out this unit.
So how does the unit work.
Clip the unit onto your mirror, sort out the power cable, hiding it behind the trim as much as you can and then power the unit up and let it go through a self test first.
Leave the hi/low power setting on high to start with, this in indicated by a blue LED
As you approach a live gatso camera the Cheetah will start with a warning beep and a green LED, progressing to a faster warning beep and a amber LED then finally a red LED and a rapid beep. The closer you get the faster the beep.
Warnings are very good for a sub £200 unit, they are as good if not better at time than the industry standard Bel and Valentine units. Given the fact that the unit is also fitted in an optimum position in a car this also improves on the range of detection. For £200 you will not be disappointed
I have tested it in two cars one with a heated screen and one without and noticed little difference in range, however the Renault screens knock the signal out.
Gatso Test. We now do a new test. The radar head is in free air, by this we do not have the radar head in the car but outside on a portable power supply and walk up to the gatso from behind until we get a reading. We then use a laser gun to get the range from the point of alert to the gatso camera. Several readings are taken and then we average them out.
| Approaching back of Gatso. Range in feet (metres) |
- Cheetah - 740ft (225m) = 8.4 second warning at 60mph
Other detectors in this test for comparison as the distances can vary from test to test.
- Bel 550 - 730ft (222m) = 8.2 second warning at 60mph
- Bel 966 - 745ft (227m) = 8.4 second warning at 60mph
- Morpheous Radar Head - 750ft (228m) = 8.5 second warning at 60mph
- Valentine One (2002 Edition) - 680ft (207m) = 7.7 second warning at 60mph
Please note: Detection range will vary depending on mounting position and type of car and wind screen. We suggest you try different positions in you vehicle to maximise range. If you are approaching the face of a gatso you can expect ranges of 3x what is shown above in most cases.
Speed v Distance covered.
30mph = 44ft/sec
40mph = 58ft/sec
50mph = 73ft/sec
60mph = 88ft/sec
70mph = 102ft/sec |
Hand held radar.
On the test road we use, 2000ft straight, bend and then 1000ft straight, we had no problem in getting warnings from round the bend, nearly 3000ft away. On a long straight the unit could cope with even greater distances, well before the police would be able to lock on to you.
Laser Gun Test.
The Laser gun was used in two ways, the first test was directly at the car with the detector in it, although the detector worked and was instant on alarm, if the officer used the first reading you were in trouble. However they often take a few readings so you may have a chance to slow. The second test was to have two cars in front and the operator target the first car and see if there was enough scatter for the third car to get an alarm, it was not a problem we had an alarm in all the runs.
Close range laser hits were a problem however, as the unit is mounted so high we could hit the car with laser on the number plate, get a speed but no warning. This is however common on most laser detectors if mounted up high. Laser however is best dealt with by the use of a laser jammer.
In our opinion you could get a warning or you could get nicked when it come to the Laser alert mode.
False Alarms.
False alarms are low and more than acceptable.
Can we recommend it, YES.
This is a great unit for £200, discreet to fit, easy to use.
Detection range is great, you will not be disappointed.
| What do we like. |
What don't we like. |
- It doesn't look like a radar detector, great for
countries that have bans on radar detectors.
- Simple to use.
- Easy to fit
- Good radar warning range.
- Volume is good
- Great mirror, it really improves the view
behind and to the sides
- 2 year warranty
- Price, £200 is a good price for this bit of kit.
|
|
UPDATE: 15th April 2004
The Cheetah has been updated. They are now on Version 3.
Here are the changes.
The mute button relates to a 'City Mute' facility. When this is activated, the unit will give just one second of audible warning before becoming silent. LEDs operate as usual for the duration of the received signal, so you can easily tell the strength of the signal. The alternative mode is 'Motorway' meaning the unit will give an audible warning for the duration of the signal (Motorway mode remains the same as v2). The sensitivity is not reduced when 'City Mute' is selected - the unit remains at maximum sensitivity at all times.
In addition to the City Mute function, they have also added in a selectable radar band switch. K band and Laser are always on, and now the user has the option of switching on or off Ka and Ku bands together.
The LEDs have a slightly different role now, most noticeably the Night Mode indication is now given by the on the left most LED, while Ka + Ku on is shown by the right most LED. The self test procedure runs through simulated warnings in whichever mode/modes the unit is currently set.
Review done. 12th July 2003