Updated August 2004
Road Pilot have added a laser detector to
the package to bring it up to speed with other systems. The
LaserPilot, as they call it, can be mounted inside or outside
the vehicle and if you have an old system you can add the
LaserPilot through an upgrade. The cost of the LaserPilot
is £49.95. You can use multiple LaserPilot's if wanted
for front and rear coverage.
We have tested it on a readers system and as expected it
works just fine. The real question is will it give you enough
warning? Its 50/50 in our eyes as you can expect with any
laser detector though.. Check out the new FAQ on Laser detectors, here
Aug 2004
Updated April 2003
Above: Roadpilot on the screen
Above: Side View showing the swan neck, speakers
and sucker
The New Roadpilot is the latest product to
come out of the Road Pilot stables.
Using a high resolution touch screen the Roadpilot currently
offers more features than any other system currently on the
market. The Roadpilot will not only inform you that you are
approaching a fixed speedtrap but also offers other features
that have never been seen in a GPS speedtrap warning system
so far. Features such as. Digital and Analogue Speedo Page,
Mileage Manager page, Track back page, GPS status page and some
others. It is also a modular system, plans are in the pipeline
to add a Radar detection module, Bel 975 and 966 heads, and
some other additions not fully announced yet. Since the system
is software driven all that will happen is the software will
be updated to allow for the new module.
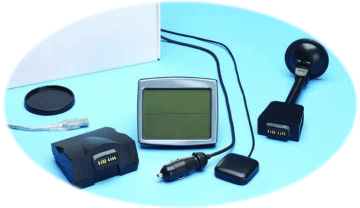
So for £499.95 what do you get. In
a rather smart tin box there is the Roadpilot unit, adjustable
mounting arm incorporating a power cable with cigarette lighter
plug and speaker, GPS Antenna with magnetised base, Self adhesive
dash mount adapter plate, Desktop RoadPilot - PC USB interface
unit and quick reference card.
The antenna and power cable are more than long
enough for most cars, but don't expect to get the antenna to
reach to the rear of the car the as lead is only 2m long. Placing
the antenna outside gives the best signal and the least drop
outs.
Both cables are hard wired into the mount, this
could make for a problem when it comes installing the unit if
you intend to hide the wires. However after opening the bracket
I noticed that both cables are fitted with connectors. Be
VERY careful if you do this however the contacts are
very easy to break, but it will allow you to disconnect both
the power and antenna so you could run the cables through the
dash for a neater fitting.
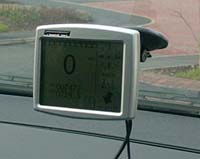
The kit looks and feels solid in its very smart
satin aluminium look case. Mounting options are very good and
its easy to get the screen in a position you want. It comes
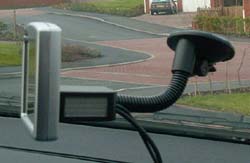
in two main parts, the screen and the support bracket. The
support bracket contains the two speakers for the voice and
beeps, antenna lead and power lead and swan neck with sucker.
You can remove the swan neck by loosening the screw in the mount
and then just use the mount for more concealed positions. The
swan neck is long enough without being to long as to cause excess
vibration.
When you remove the screen you leave the support bracket in
its place and the screen slips in your pocket, its so small
you don't even know its there. Buy the optional leather case
for the screen, its well worth it and looks the business.
The Road pilot can be fitted on the windscreen
with the suction cup, or fixed to any part of you dash with
self adhesive dash mount adapter plate. The windscreen transmits
less vibration through the mount to the Roadpilot. The remote
GPS antenna will make life much easier allowing you to place
the antenna in a prime position to allow for a good view of
the sky or away from a heated screen.
The first time RoadPilot is powered up, it may
take up to 45 minutes to initialise and to come online. Mine
took about 5 minutes.
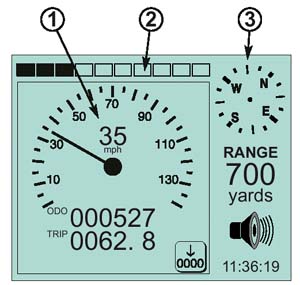
Fig. 1
The Roadpilot has no buttons, not even a power
on button. All the controls are done via the touch screen and
your finger, this works quite well. The display is backlit in
a pale blue, there is no adjustment to the brightness, could
be a nuisance in some cases but Road Pilot do seem to have the
setting about right.
The RoadPilot display is divided into three sections
- the multifunction display area (Fig 1, 1), the proximity indicator
(Fig 1, 2) and the information display (Fig 1, 3).
Proximity Indicator - (Fig 1.2) The range adjustable proximity indicator is a series of bars
along the top of the display which show how close your vehicle
is to a speed camera.
Information Display - (Fig 1, 3) Current compass
bearing. Range to nearest camera or way point. Audio mute icon.
Speed limit. The current GPS time.
Multifunction Display - (Fig 1, 1) Incorporating.
Satellite status page - Shows the reception status
of the system.
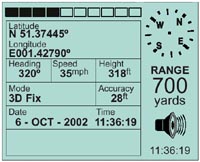
Above: GPS page
Speedo page - Digital or Analogue Speedo and mileage.
The speed of the vehicle, odometer (Mileometer), re-settable
trip meter.
Tracking page - This screen shows a breadcrumb trail
of where you have been. This can be downloaded to Map Point
if wanted.
GPS page - The GPS page is a summary page which
shows the following information, the vehicle’s current
position as Latitude and Longitude, the current heading, the
vehicle’s speed, the altitude, the position fix mode, the
accuracy of the fix in ft/meters, the date and time
Camera page, The RoadPilot also automatically
selects this page when the vehicle is approaching a camera location.
The camera page visually shows the location of any cameras relative
to the vehicle’s position including way points.
Setup page - This only works when stationary and
allows you to customise the settings such as Volume, Contrast,
Units (MPH / KM/H), Speedo type, Set time, Daylight Saving Time,
Language, Country, Information Page. Other functions will be
added here for Radar and Laser Systems. Demo Mode.
Exit to previous page - As its says
Store new camera location - As its says
Store way point - As its says
Delete camera/way point - As its says
Mileage Summary - Mileage Summary page showing
the mileage's recorded, categorised as Business, Private, Commuting
and Total Mileage
There are lots of options and I would suggest
that you have a look at the instruction manual on the Road Pilot
site, I could be here all day explaining them, after all I am
here to tell you if the Roadpilot is any good. Function wise
they have added some good features as I have described above.
In practice the unit works very well.
In use I have the Roadpilot set on the Digital
Speedo Page, its a nice big display of the speed you are going
and its shows just how bad some car speedo's are, the Roadpilot
displays 60mph and the car displays 64mph.
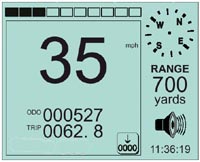
Above: Digital Speed page.
I have my Roadpilot set for a 1 mile warning.
Auto ranging is on so this varies the alert distance depending
on my speed, slow = shorter warning range, fast = longer warning
range.
I also have the digital speedo page showing, this constantly
gives me my vehicle speed, trip distance and total distance.
The info display remains down the side. The range to the nearest
speedtrap zone, compass and time are shown there. When I am
within range of a speedtrap, the digital speedo page is replaced
by a camera proximity page, this shows the relationship of my
vehicle to the pending speedtrap and the trap moves in closer
on the screen to my vehicle, shown below by a square, as I get
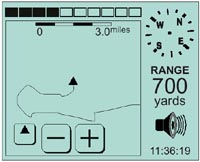
closer in real life to the camera.
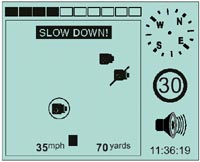
Above: Camera proximity page, the car
is the solid square at the
bottom next to 35mph. The camera in the circle is the one you
are being
warned about, the one with the line through it is on the other
side of the road
The warnings you get are clear and very concise.
When the warning is activated the Roadpilot confirms the speed
limit of the road you are on in the side bar and by voice. The
Roadpilot also warns you by voice (SLOW DOWN) or by a warning
beep to slow down if you are over the speed limit.
Adding speedtrap's is easy. Press the screen
once and you then get another option, Add Speedtrap, Delete
Speedtrap/way point or Add Way point. Press the box wanted on
the screen and the job is done. The way point option is for
your own use to log points of interest, mine is for mobile laser
sites. Road Pilot have plans to add other databases to the system
i.e.. Schools, garages, fast food etc. and you will be able
to decide what you want on or off with the interface software.
Updating is done by a USB connection. Serial cable
and modem to follow soon. You remove the screen and place it
on the USB interface, click on the software (PC only), request
a database update and then it does the rest including changing
the firmware if there is a new release. Firmware is updated
if any new features have been added.
You also receive some software, that will allow
you make changes to the Roadpilot. Such as, changing the databases,
downloading your mileage to Microsoft Excel. You can even take
the information on the Track back screen and download it onto
Microsoft Map point. The Track back screen allows you to retrace
your trip if you get lost, not easy to use as a track back feature
as no map is shown, but great to download to Map point and show
you route taken.
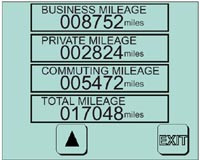
Above Left: Mileage
manager page. Above Right: Tracking Page
Road Pilot have thought about this product
and done a very good job of making a touch screen and software
driven system, they however could have made some additions
to the system such as a over speed warning page. i.e. you set
it for 80mph and whenever you go over 80mph it gives you a simple
alert to remind you.
Variable traps on the M25 give a warning of
20mph even when the variable speed limit is at 70mph, this is
annoying as every gantry is logged on the variable section of
the M25 even if its not fitted with cameras, I found myself
muting the system on the entire stretch because it was constantly
telling me to slow down.
Overall the Road Pilot has a lot to offer. In the first few weeks Road Pilot changed the software quite
a few times and the Road Pilot just got better and better. The
system is totally software driven and this allows Road Pilot
to add new features. So in theory the unit should never become
out of date.
London's congestion charging cameras have been
added to the database, you now get a warning if you approach
the area allowing you to take avoiding action if you wish.